Kinect(キネクト)によるダンスとテクノロジーの融合A dance performance utilized with technology
オランダからの留学生として福岡に来ているエブリンです。
2年前、私は「Kinect(キネクト)」を使ったインタラクティブ・ダンス・パフォーマンスについての卒業制作に取り組みました。
I’m Evelien, 24 years old, and from Holland, the country of tulips and windmills. I came to Fukuoka for a research project at Kyushu University and will be staying here for another 5 months.
About 2 years ago I finished my master’s thesis, for which I made an interactive dance performance with the Kinect.
ダンスについて教えて!とみなさんに言われることが多いので、卒業制作完成までの詳しいプロセスや使用したソフトウェアについて、またその際に直面した問題などをここに書いてみようと思います。同じようなダンスプロジェクトをされている方のお役に立てたら幸いです。
完成させたいという強い想い
卒業制作のテーマの一つとして、ダンサーが後方のスクリーンに映し出された映像と融合しながらダンスを繰り広げるインタラクティブ・ダンス・パフォーマンスを行いましたが、難しいテーマに対してネガティブになるのではなく、どんなことでも挑戦的に受け入れようという私自身の信念だけを頼りに制作を進行させました。
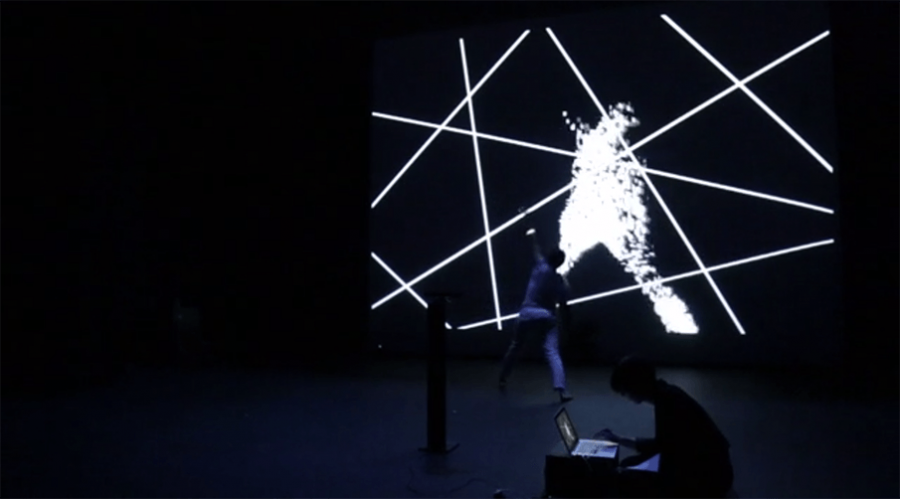
私は流れる音楽に合わせて、様々なキーを押しながらビジュアルライブをコントロールしました。この動画をご覧いただき、手前でMacBookを操作しているのが私です。
制作に取り組んでいる間、私は何度もダンサーとワークショップを重ね、彼女のアイデアをヒアリングしました。それによってダンサーが持つ個性に音楽と映像をマッチさせ、最終公演を迎える頃にはより完成度を上げることができました。
彼女とのワークショップのおかげで、起こりそうな問題を予想したり衣装をブラッシュアップすることができました。また私が組んだダンサーはとても経験豊富だったので、彼女から色々なことを教わりました。
ダンスと音楽と映像の競演
音楽は「Logic Pro」を使って作曲しました。ダンスと映像をリアルタイムで組み合わせたかったので、「Kinect」というモーション・キャプチャ装置を使う必要がありました。「Kinect」は赤外線の点を人間の表面に映して反射したパターンを赤外線カメラで見ることによって動いている人を検出できる物です。このメカニズムで距離を測り、人間のような対象を認識することができます。
「Kinect」をコンピューターとUSB接続したうえで専用のドライバーにより情報を解読し、どんなプログラミング環境でも使うことができます。私はMacBookを使いたかったので、オープンソース・ドライバー「OpenNI」を選びました。
映像はプログラミング環境「Processing(Javaの高水準バージョン)」で書きました。四角や線などの簡単な映像を作ることができるソフトです。そこで示された通りにキーを押して映像を変え、プログラムの中でコードの活動とリンクさせていきます。
問題発生!その時…
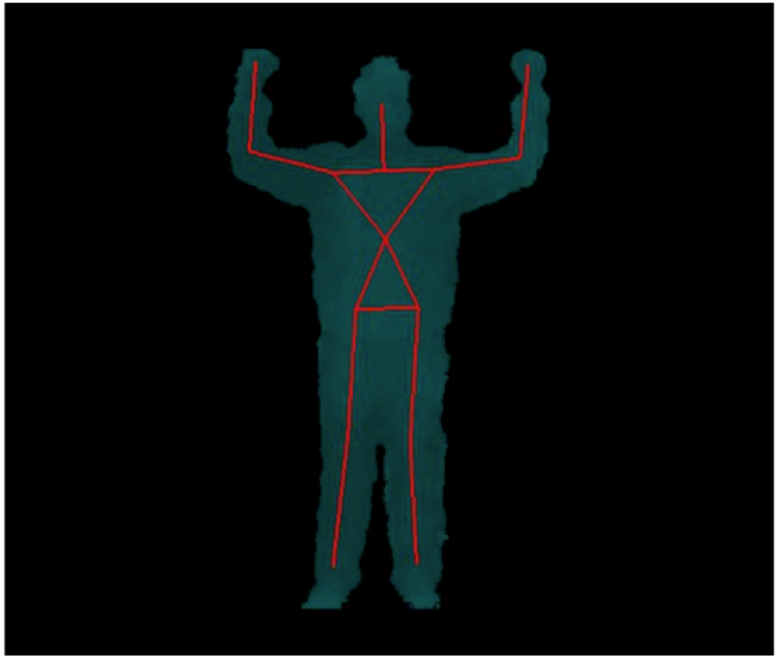
私が最初に考えていたのは、脚や頭などの体の部分を登録できるジョイント検出を使うことでした。そうすると「Kinect」にはこのような棒状の線画が描かれます。
しかし問題点がありました。Macでは私が使用していたソフトウェアの一部しかアップデートされないことが分かったのです。そのため私のプログラムは暴走し続けてしまい、バグをなんとかするには「Processing」の古いバージョンを使って、ジョイント検出をスキップするしかありませんでした。
その代わりに、人の輪郭を検出してそこからブロッブ(塊)を作り出す、ブロッブ検出を使いました。1週間でプログラムを書き直さなければならなかったため、結局 「Amnon Owed」のプログラムを使用して、既存のプログラムに適応させることになりました。
最終的にパフォーマンスは大成功でしたが、私はその週ほどストレスを感じたことはありませんでした。
楽しみながら学ぶ
公式の「Kinect SDK Software」かWindows環境であれば、継続的に更新されるので「Kinect」はお勧めできます。もしプロジェクターを使っているのなら、その品質を常に確認しておくことが必要だと思います。コンピュータ・スクリーン上で見るよりも映像のコントラストが弱く感じられるかもしれないので、コントラストは強めに描いておきましょう。
このダンスパフォーマンスは全体を通して私が好きなモノを寄せ集めたような内容でしたので、本当に楽しみながら多くのことを学びました。もし「Kinect」や「Processing」に関するアイデアを思いついたら、是非試してみてください。そしてご質問があればいつでもどうぞ。
原文はコチラ
ー日本語版翻訳:舘 沙也子
As I was asked to tell more about it, I’ll give here details on the process, the software I used, and the problems I ran into. I hope this can help people who would like to do a similar project.
The piece which I made for my graduation project was an interactive dance performance, where the dancer interacted in real-time with the visuals projected in a screen behind here. The progression of the piece was based on my own idea of adapting to challenging situations by embracing them, instead of resisting them. The music was pre-composed, and I controlled the progression of the visuals live by pressing different keys. In the video of the performance at the graduation show you can see me in front of the dancer, sitting with my MacBook (and that’s why the sign on my MacBook is covered, for if you were wondering.
Tideline performance at MMT grad show 2014 from Evelien Al on Vimeo.
While working on the project I had several workshops with the dancer to talk about the piece, and hear her ideas on it. This really helped me as it gave me the chance to adapt the music and visuals to her personal style, so the final performance became more complete. Also, it allowed me to foresee difficulties that might arise, and things I still had to think about such as the clothes the dancer would wear on-stage. The dancer I was working with had much more experience performing than I did, so she could tell me about these important facts.
The music was pre-composed using Logic Pro. However, as I wanted the visuals to interact with the dancer in real-time, I had to use a motion capture device, in my case the Kinect. The Kinect can detect a person an its movements by projecting infrared dots on a surface, and detecting the pattern that’s returned via an infrared camera. With this mechanism it can detect depth, and separate different objects in an environment such as people. The Kinect can be connected to a computer via USB, and with a specialised driver you can decipher the incoming information, and use it in any programming environment you’d like. As I wanted to use my MacBook I chose to use the open source driver OpenNI.
The visuals were written in the programming environment Processing, which is a higher-level version of Java. Here you can very easily create visuals such as squares and lines. As indicated before I changed the visuals by pressing keys, linking different keys to the activation of different lines of code in my program.
My initial plan was to use joint detection, via which you can register for example the legs, feet, and the head, all separately. A result of this you might know is the Kinect stick figure:
However, I soon ran into problems with this. It turned out that some parts of the software I was using were updated, while others were not. Because of this my program kept crashing. The only way to get rid of the bug was to use an older version of Processing and skip joint detection.
Instead of that I used blob detection, which detects the outlines of a person and makes a blob out of it. Because of this I had to rewrite my program in less than a week, and I ended up using programs of Amnon Owed and adapting them to my piece. Even though the performance went really well in the end, I have never been as stressed as during that week!
Therefore I would recommend anyone who wants to work with the Kinect to use a Windows computer instead, and the official Kinect SDK software. It is much more robust as it has been kept updated. And if you’re using a projector, keep the quality in mind. The contrast might be much lower than on your computer screen, making visuals blurry and less visible.
All in all, I really enjoyed this project, as it was a mix of many things I love, and I learned loads of it. If you have some awesome ideas with the Kinect or Processing please try them out, and if you have any questions you can always contact me.


